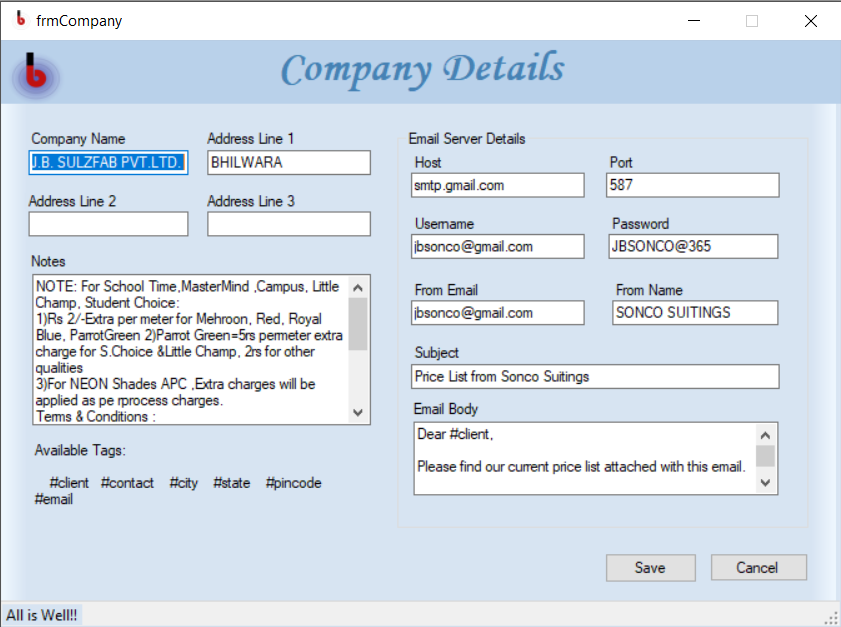
Adding a Company
To add a new company to the Price List Manager, follow these steps:
- Company Name: This is the name of your company. It should be entered accurately to ensure consistency across all communications.
- Address: Enter the physical address of your company’s location. This address will be used for various purposes like invoices, emails, and reports.
- Notes: Use this space to add any additional notes or information relevant to your company. These notes can be about special instructions, reminders, or other important details.
Available Tags
Tags are placeholders that can be used in various templates throughout the software. These tags will be replaced with the corresponding information when generating documents, emails, or reports.
- #client: This tag will be replaced with the client’s name or information.
- #contact: When this tag is used, it will be replaced with the contact person’s name.
- #city: This tag will be replaced with the city name from the company’s address.
- #state: When using this tag, it will be replaced with the state name from the company’s address.
- #pincode: This tag will be replaced with the postal code (pin code) from the company’s address.
- #email: Utilize this tag to insert the client’s email address for personalized communications.
Email Server Details
The Email Server Details section allows you to configure the settings required to send emails from within the Price List Manager software.
- Host: Enter the hostname or IP address of your email server.
- Port: Specify the port number for the email server’s outgoing mail.
- Username: Provide the username associated with the email account used to send emails.
- Password: Enter the password for the email account provided above.
- From Email: This is the email address that will appear as the sender when emails are sent.
- From Name: Enter the name you want to be displayed as the sender’s name in outgoing emails.
- Subject: Define the default subject line for emails sent from the software.
- Email Body: Create the default content for the email body. You can use the available tags to personalize the email content.
Example Email Template:
Hello #client,
Attached, please find the latest price list. If you have any questions, please feel free to contact us at #email.
Best regards,
Your Company Name
